How To Remove Fake Nails Without Damaging Your Own
 shutterstock
 In March, salons across the country closed with little notice, due to the spread of coronavirus.
At the time, many people had gel or acrylic nails, and even though the salons have opened in some states, there are individuals who don't want the risk and would rather remove their nails at home.
But how do you remove fake nails without causing damage?
Well, first, it depends on the type of nails you're dealing with. Are they gel? Acrylic? Simple press-on nails? All have unique properties.
"All three use the same general products but take different steps and timing,” says Julie Kandalec, celeb manicurist and author of Nail Art Design Book. Acrylic and dip removal utilizes a bowl, and gel polish utilizes the foil. Full coverage tips can use either method.
Here's how to remove fake nails of all different kinds.
While experts have slightly different methods for going about nail removal due to their own preferences, the procedures remain largely the same. So, whether it's acrylic, gel, or even press-on nails, you'll have them off in no time.
How to Remove Acrylic Nails at Home
It's important to take the proper steps to safely remove acrylic nails at home.
“First, you will need to use a coarse grit nail file to file off as much product as possible. Make sure to not be too rough where it starts to cut the skin around the nail,” advises Hannah Lee, Sally Hansen Brand Ambassador.
Then, soak your nails in 100 percent acetone.
“I recommend applying a generous amount of cuticle oil to your nails to help protect from the harshness of acetone,” recommends Lee. You can dip your nails in an acetone filled bowl, but you may want to use a cotton ball soaked with acetone onto each nail and wrap it with foil, as this method is not as harsh on the hands and nails.
Soak for approximately 20 minutes, and see if any product has loosened. “You can try to gently scrape the acrylic off with a cuticle pusher or orange stick. If it's still pretty stuck, soak again for 5 more minutes, and check again,” Lee adds.
Repeat this process until the product can be scraped off without too much force as to protect the nail surface.
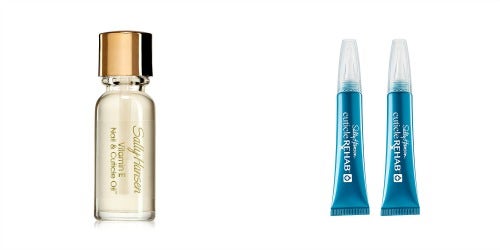
Wearing acrylics can take a toll on your nails, so once all of the product has been removed, make sure to rehydrate with a good cuticle oil.
Try these products:
For another spin on acrylic removal, Julile Kandalc uses a Soak and Roll Method, which involves soaking in a bowl.
What you'll need:
- 100 percent pure acetone (not acetone polish remover)
- 2-3 coarse nail files (100/180 grit)
- 1 padded buffer
- 1-2 orangewood sticks
- 1 medium grit nail file (220/320 grit)
- 1 fine grit nail file (400/600 grit)
- Cuticle oil
- A glass or ceramic bowl (never plastic!)
Instructions:
1. First, soften the edge of your coarse files.
This is so you don’t cut your cuticles by running them on the side of another coarse nail file.
Using the 100 or 180 grit file, file off as much of the product off as you can, or about 75 percent. This is important as it cuts down soaking time significantly. Leaving the surface extra rough will allow the acetone to penetrate easier.
Note: Never clip your enhancements because they will crack and cause damage to your nail.
2. Apply cuticle oil to the cuticle area and underneath the free edge.
Use a dropper or Q-tip instead of the brush to stay germ-free.
3. Pour the acetone.
Pour about 1” of acetone into your bowl and place your hand in. You can also do one hand at a time so you can text or snack.
4. Cover with a towel.
This will prevent evaporation and allow the acetone to work faster, too (it works faster with body heat). Never use actual heat, since acetone is very flammable.
5. Once the acrylic softens...
When the acrylic is softened (5 to 15 mins), gently nudge it towards the tip of the nail using an orangewood stick (not metal). Never push towards the cuticle (against the grain) just after they’ve been soaking in acetone.
6. Use your medium grit file to roll the softened acrylic off the nail.
Do this until it doesn’t roll anymore.
7. Re-apply cuticle oil and re-soak.
Repeat until all acrylic or dip is gone.
8. Finish by lightly smoothing nails with your fine grit file.
9. Apply cuticle oil to re-hydrate.
And you're done!
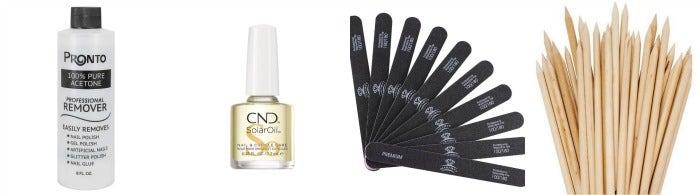
Try these products:
- Pronto 100% Pure Acetone
- CND Essentials Nail & Cuticle Oil
- MAKARTT 100-180 Grit Nail Files
- Orangewood Sticks
How to Remove Gel Nails at Home
“To remove gel nails at home, take a coarse nail file and carefully file down the top layer of gel,” says Lee. You want to focus on removing the top coat and not the actual polish, so make sure to do this slowly.
A great tip is to apply a generous amount of cuticle oil to your nails, which will help with protection from the acetone since it's very drying to your skin. You can dip them in an acetone filled bowl, but the best way is to soak a cotton ball in acetone then place it on top of the nail, wrapping each finger with foil.
Check in at around 15 minutes to see how your progress is going. “If the polish doesn't look lifted and falling off the nail, keep soaking for another 5 minutes,” Lee recommends.
After getting the lifted result, remove the foil tips by adding a little pressure to help pull off the polish. If you have any piece still attached, you can gently push it off with a nail stick.
Now, it's time to regain lots of moisture, so be sure to lather your nails up with cuticle oil again.
As for Julie Kandalac's advice, she uses the foil method.
What you'll need:
- 100 percent pure acetone
- 2-3 medium grit nail files (180 grit)
- Cotton (the fluffier the better)
- 2"x 2" squares of aluminum foil (the thin, cheap stuff is better than heavy-duty)
- 1 padded buffer
- 1-2 orangewood sticks
- 1 medium grit nail file (220/320 grit)
- 1 fine grit nail file (400/600 grit)
- Cuticle oil
- A glass or ceramic bowl
Instructions:
1. First, soften the edge of your files.
This way, you don’t cut your cuticles by running them on the side of another coarse nail file
2. Using a 180 grit file, file off the topcoat.
You'll see the color and texture change. It's okay to gently file off a bit of the color, too.
3. Apply cuticle oil to the cuticle area and underneath the free edge.
Use a dropper or Q-tip instead of the brush.
4. Take a tiny bit of cotton and completely saturate it in acetone.
5. Place on the nail and wrap a square of foil around it.
Gently squeeze to lock into place. Use only a little bit of cotton and be sure to use a lot of acetone. Acetone evaporates quickly, causing it to stop the removal process prematurely.
6. After waiting 15 minutes, check the first nail.
The gel should curl up and flake away with an orangewood stick.
Note: Never use a metal pusher during the removal process. Also, only work the gel towards the tip of the nail, never back towards the cuticle or "against the grain."
7. Re-apply cuticle oil and re-soak if needed.
Repeat until all gel is gone
8. Finish by lightly smoothing nails with your fine grit file.
9. Apply cuticle oil to re-hydrate.
Try these products:
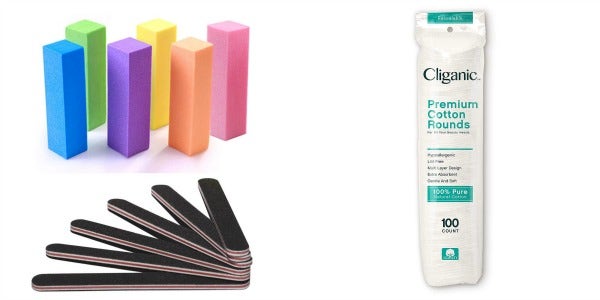
How to Remove Press-On Nails at Home
To remove press-on nails without damage, you will want to soak your nails in polish remover.
What you'll need:
- Nail polish remover (acetone-based)
- Soft nail buffer
- Cuticle oil
- A glass or ceramic bowl
Instructions:
1. Use nail polish remover to soak the nails.
“It does not need to be 100 percent acetone since press-on nails don't attach as strongly as acrylic and gel, since they typically use nail glue or nail adhesive,” says Lee.
It's best to use a polish remover that is at least acetone-based. You can simply soak your nails in a small bowl of remover for a couple minutes and check to see if the nail has lifted.
2. Check to see if the nail has lifted.
If they still seem stuck after soaking, you can try to use a soft nail buffer to loosen and until they fall off. Adds Lee, “Make sure to not prematurely peel off the false nail since this can damage your nail surface.”
3. Add cuticle oil.
Of course, your skin and nails will be dry after this, so make sure to rehydrate with cuticle oil. And that's it!
The differences between these three methods is in the soak time, since most press-ons are just made of plastic.
Concludes Kandalec, “They usually come off much faster than gel polish or acrylic!” Just don't pry them off.
Aly Walansky is a NY-based lifestyles writer who focuses on health, wellness, and relationships. Her work appears in dozens of digital and print publications regularly. Visit her on Twitter or email her.
YourTango may earn an affiliate commission if you buy something through links featured in this article.