How To Dry Clean Your Clothing At Home
Dry cleaning offers a safer option to preserve your clothing.
 getty
getty As people continue to stay home during coronavirus, they are doing a lot of their outside chores at home. People are getting groceries delivered, skipping the nail salon, and cutting their hair from the comfort of home.
They may also be doing their own dry cleaning. Because for some, stopping at the dry cleaner on the way to work is as big part a part of life as grocery shopping or visiting the post office.
It’s about more than social distancing, too. Dry cleaning from outside stores can get very expensive, especially if you have many items.
So, if you can stay safe and save money, why not try learning how to dry clean at home?
It turns out that dry cleaning is an easy process. But there are certain steps to follow.
First, you need to know which items are safe to dry clean. Otherwise, you will end up ruining your clothes!
“You can do this by checking the tags on the clothes,” advises Azza Shahid of Smith Thompson. Clothes made from wool, cotton, and silk are often marked “dry clean only” and can be easily dry cleaned at home. On the other hand, clothes made from leather, suede, and fur should not be dry cleaned at home.
Here's how to dry clean your clothes at home, without having to set foot outside.
1. Use the water test.
“We’ve developed formulas that allow you to wash 'dry clean' garments at home such as cashmere, wool and silk,” says Gwen Whiting, co-founder of The Laundress.
Before washing any “dry clean” fabrics, perform a water test. What is a water test? According to Whiting, “A water test will determine if a garment is safe to wash."
And here's how to do it.
"Find an inconspicuous area on the item, such as a seam or hem, and submerge it in warm water." In addition, look for changes in character or texture in the wet area: tightening, shrinking, stretching, warping, or the formation of ripples or wrinkles. "Be on the lookout for fabric elongation, which may not happen instantly," she adds.
If you encounter any of these problems, you can dry clean the item.
Note: If you’re not able to submerge a part of the item in warm water, you can do a “spot test.” What is the spot test? Says Whiting, "To spot test, wet a clean, white, lint-free cloth and blot the item."
2. Pre-treat stains before dry cleaning.
Much like with regular washing, you want to pre-treat stains before dry cleaning. Otherwise that's a stain you may end up stuck with for the long while!
Examine how heavily the clothing is stained. “If the cloth has two to three stains, then it can be easily dry cleaned at home. But if it's heavily soiled, it's better to get it dry cleaned from outside,” Shahid recommends.
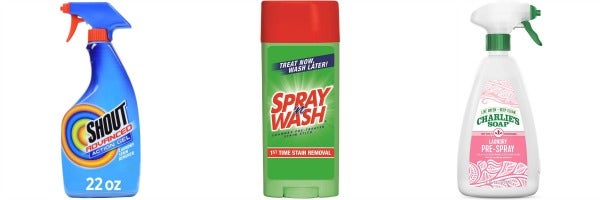
Try these products:
- Shout Spray and Wash Advanced Action Stain Remover for Clothes
- Spray 'n Wash Pre-Treat Laundry Stain Stick
- Charlie’s Soap Laundry Pre-Spray

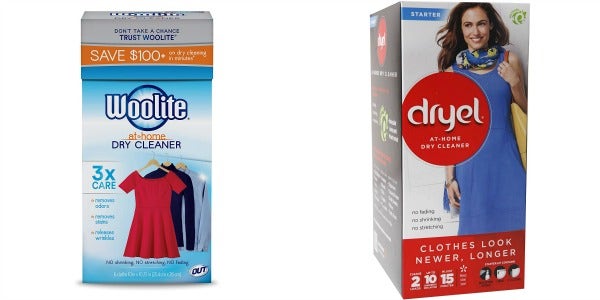
3. Consider buying a dry cleaning kit.
There are dry cleaning kits available in the market that you can get for your home. Says Shahid, “You can treat oil or water-based stains with these kits to prepare the cloth of dry cleaning.”
If you do purchase a dry cleaning kit, here are the steps to take:
Step 1. Place your items that need dry cleaning in the dry cleaning bag. "You can put three or four pieces of clothing together, just make sure they are of the same color so the dye does not bleed,” Shahid warns.
Step 2. Fill the bag halfway so the clothing inside the bag can rotate.
Step 3. Unfold the dry cleaning sheet and place it inside the bag. Adds Shahid, “The dry cleaning sheet contains an emulsifier to keep it dispersed, and a perfume to freshen the smell of your clothes.”
Step 4. Close the bag once the sheet is placed inside.
Step 5. Put the dry cleaning bag inside the dryer. Then, turn the dryer to medium heat for 30 minutes.
Step 6. As soon as the timer goes off, retrieve the clothes from the bag and hang them on the hangers to let the wrinkles fall out.
Try these products:

What do you do if there are stains on your clothing?
That makes things a bit trickier, but paying attention to the fabric of your clothing helps.
- Cotton: “Cotton can endure hot water, cold water, repeated washing and scrubbings,” advises James Conner, Vice President of Molly Maid. If the stain is on cotton, you have the most options for removal.
- Wool: “More delicate than cotton, wool cannot endure repeated washing and should be spread flat to dry,” Conner says.
- Synthetic: Stains on synthetic fabrics can be tricky, especially paint stains. Adds Connor, “Some solvents like acetone or ammonia can melt or degrade the fabric,” so be very careful.
- Silk: A very delicate fabric, says Connor, “Silk can be ruined if the stain removal efforts are too hostile.”
To dry clean silk clothing...
Step 1: Turn your silk inside out.
According to Whiting, “Fill a basin or sink with cool water and add two capfuls of delicate wash detergent. Submerge the item and gently swirl the water around with your hands until the detergent is fully dissolved. Soak for no longer than 30 minutes.”
You can also use a washing machine, just be sure to use cool/cold water and a delicate setting, inserting the silk garment into a mesh washing bag first.
Step 2: Run cool water through the garment until it rinses clean. But don't wring the garments out! Instead, press excess water out with your hands or against the sink.
Step 3: Hang to dry or lay the item flat in its natural shape.
“Once dry to the touch, steam to release wrinkles and bring out the silk’s natural luster. Between washes, a misting of spray designed to add fragrance will banish icky odors and add a refreshing scent,” Whiting says.
To dry clean wool and cashmere clothing...
Step 1: Prep the item for washing. Adds Whiting, “Flip the item inside out to halt friction and fading while washing.”
Step 2: Begin hand washing, but choose the correct detergent.
Add two capfuls of Wool & Cashmere Shampoo. Many detergents can be harsh on your fabrics, but this one is pH-neutral and gentle. Add detergent to a basin or sink of cool water.
“Submerge the garment, agitate with your hands, then let it soak for 30 minutes. If you’d rather use the machine, place your item in a protective mesh bag and use the following settings: cold water + woolens or delicate cycle + low tumble,” advises Whiting.
Step 3: Run cool water over the item until it’s no longer soapy. “Gently press against your sink or basin to drain excess water—don’t wring or twist,” she adds.
Step 4: Lay the garment flat on a drying rack or clean towel. “To avoid damage and shrinkage, keep away from direct sunlight and sources of heat, such as a radiator. If you’re in a rush, lay your item flat on a towel then roll both upwards, as if you’re rolling up a sleeping bag,” she says. This will quickly sop up excess water.
Step 5: Remove wrinkles and pilling. Remember that ironing can crush or flatten the natural pile of the yarns. Instead, steam to remove creases.
What can you use to remove stains?
Luckily, Connor breaks down the best stain-removing solvents to use. Some of them you can even find in your pantry!
- Water: Hot, cold, free, fresh and plentiful! “Water will be your first line of defense. Rinse, blot, dab and repeat; water by itself can’t do much damage.”
- Vinegar: Vinegar is a natural and effective stain remover. When using it on wool or synthetics, use sparingly, and consider spot-testing in an inconspicuous area first.
- Hydrogen peroxide: “Great for removing blood or rust stains, hydrogen peroxide has a bleach effect without the destructive color change.” It's also color-safe and disinfects.
- Detergent or stain remover: Use either of these to scrub out stains before you launder clothes normally. “Stain removers have special enzymes to help release stubborn stains.”
- Rubbing alcohol: “This is effective for removing inks, dyes and chemical-based stains.”
- Ammonia: A common and useful household cleaning chemical, “Dilute it in a spray bottle. Never mix ammonia with bleach.”
- Dish soap: A mild and versatile solvent, Connor says, “Mixed with water, dish soap is effective on grease, condiments and just about anything.”
- Mineral spirits or acetone: “These are necessary to remove paint stains, but can be harsh on synthetics.”
- Bleach: “Effective yet harsh, bleach is usually a last-resort option for removing stains from whites.”
To remove stains...
Step 1. Air dry first. “Before drying the garment in a dryer, make sure the stain is removed,” Conner warns. Otherwise, the heat could set the stain.
Step 2. Treat all stains as quickly as possible. And always spot-test solvents on clothing before proceeding.
Step 3. Test if a garment is colorfast. To do this, recommends Connor, “Pour a small amount of hot vinegar in a small area, and let it rest for three minutes. Blot it with a paper towel.” If color comes off, the garment is not colorfast, and color could bleed.
Step 4. Remember that some stains remove best when cold. “Stick the garment in the freezer, put an ice cube on top of the stain or spray it with a can of compressed air upside down,” he adds. If the stain persists, repeat steps as necessary.
Aly Walansky is a NY-based lifestyles writer who focuses on health, wellness, and relationships. Her work appears in dozens of digital and print publications regularly. Visit her on Twitter or email her.
YourTango may earn an affiliate commission if you buy something through links featured in this article.
